This page has been translated with google translate, there may be errors in the stories.
1312/5000
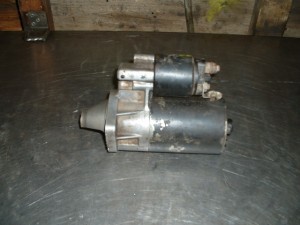
The starter motor is one of the most heavily loaded parts and also the most neglected part of the engine. It seems that most key workers forget that there is a starter motor on the engine.
Probably starter motors are just too reliable. You do not have to do anything about it for years and then something quickly falls into the forgetting corner. If problems do arise, you do not easily assume that something that always did its job suddenly needs maintenance. However, the starter motor also needs some attention from time to time. The armature rotates in bearings and these must be lubricated or replaced regularly. The carbon brushes and the springs of the starter motor also have a hard time and need to be replaced every now and then.
The tricky thing with starter motors is that the wear occurs very slowly. Every year the starting power deteriorates a little bit and therefore it is usually not noticeable. The same applies to the quality of the jumper cables. They slowly get more resistance and the starter motor gets harder and harder.
So do not immediately buy a new battery when the engine starts to get harder, but first measure things up and see where the problem lies before you buy new parts. Measuring is for sure!
Maintenance of the starter motor.
Many different models of starter motors have been used over the years, but the way of working does not differ much.
Step 1.
Disassemble the starter motor from your engine and place it on the workbench or other place where you can easily disassemble the starter motor without losing any parts.
Tip: mark the wires connected to the starter motor.
Step 2.
Now you are the first to remove the bendix. This is attached to your starter motor with 2 or 3 screws.
Please note that this is a very difficult job, especially reassembling the bendix. If you do not want to perform this step, go to the chapter Replace carbon brush only.
Hint: The bendix is also common and can be cleaned with WD 40 if you do not want to take it apart. Leave WD40 in overnight if the bendix is very dirty and / or stuck.
Step 3.
Then you will remove the head at the front. There are 2 long bolts on the back of the starter motor, these are loosened and then you tap the nylon hammer on it to release it.

Step 4.
Now go to the back of your starter motor and remove the cover. You can already see the carbon brushes. The carbon brush holder may be attached to the lid. These are usually secured with two bolts. You must first remove this, otherwise the lid will hang on the wires of the carbon brush.

Gently slide the cover upward to keep the brushes intact and in place.

The rear cover of the starter motor, two different bolts. One set to hold the entire starter motor together and one set to secure the carbon brush holder.

Carbon brush holder.
Step 5.
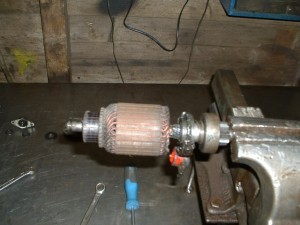
Now the anchor can also be removed from his house.
Step 6.
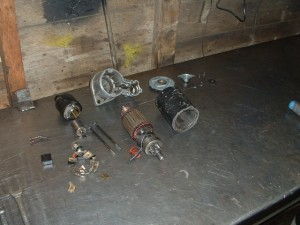
The parts should now be cleaned well, you can do this with some petrol and a brush.
You can use the washing-up bowl of mother but I do not vouch for the consequences.
Make sure that the anchor does not get too wet and that you polish everything clean, as far as possible of course.
Here a picture of all parts of the starter motor neat and free of grease and clean.

Step 7.
After everything has been cleaned properly, you have to sand the copper part of the anchor lightly.
The carbon brushes may need to be replaced, these are often available from a well-stocked auto parts store.
Step 8.
The starter motor must be reassembled.
You take the house and put the anchor through it so that the copper part protrudes at the top.
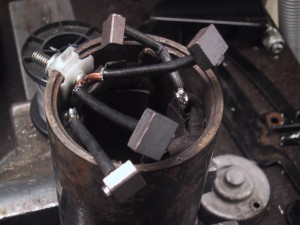
Now you pick up the element that the carbon brush is on. All 4 must be pressed in to lower over the anchor section.
Tip: Now you are short of hands and fingers. Take a piece of copper wire, squeeze the carbon brush and clamp it with the copper wire. Do this with 2 carbon brushes (see photo).

Step 9.
Now you can lower the element around the anchor. You disconnect the copper wires and all 4 brushes are in place. Now carefully press the anchor together with the element into place in the housing.

Step 10.
Mount the lid, add some grease to the slide bearings that turn on it and you're done.
Mount the head at the front. Make sure that you put the fork on it properly and that the protective rubber is placed correctly. Tighten the 2 long bolts again.
Step 11.
Now it is the turn of the bendix. Lubricate the inner part with oil (no grease and no copper grease, this only attracts dirt), engine oil is also good. Now only hook the bush on the inside of the anchor.

Step 12.
Screw the outer housing of the bendix back on and your starter motor is ready again.

Step 13.
Just try it out.
Before we put the starter motor back in the engine, it is wise to test it first. With a battery and two jump leads, we try to see if the starter motor responds well.
If the starter motor is still not working properly, it could be the bendix. A new one is for sale at a well-stocked auto parts store.
Now that you are busy, it is wise to look at the wiring of the starter motor. Often it is old and too thin in wire thickness. In the past, 16 mm2 was sometimes used, but nowadays 25 mm2 is the standard.
And don't forget the switch wire.
You will have to do this operation once every 5 years on average.
Only replace carbon brushes.
Below is a quick description if you (only) want to replace the carbon brushes.

We start by removing the starter motor end cap.

After removing the carbon brush holder can
we only have a good overview of the misery.
We start to clean things up and assemble some new carbon brushes.

We hold up the carbon brushes with a few wires
their place when mounting the anchor.
Starter motor theory:
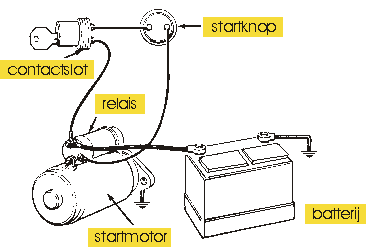
Starter relay.
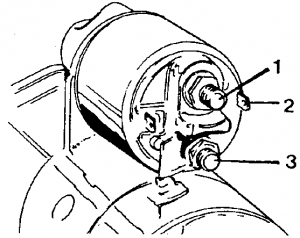
1 Terminal 30 of battery.
2 Terminal 50 of contact switch.
3 Field winding connection.
Connection diagram.
A cross section of a common starter motor.
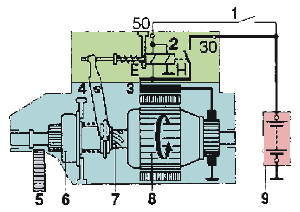
1. Ignition lock / starter switch.
2. Relay, with E (pull) and H (hold) coil windings.
3. Field winding.
4. Switch-on lever.
5. Starter (tooth) wreath.
6. Recon with freewheel clutch.
7. Helical keyway.
8. Anchor.
9. Battery (30 and 50 are standardized terminal pin numbers)

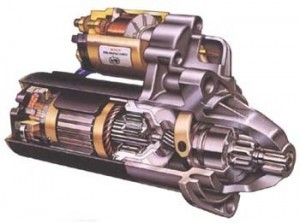
Here another cross section of a common starter motor.
Problem:
The starter does not start, you only hear a click of the relay.
Solution:
In order of control advice:
1. Bad electrical connections (loose or broken battery cable, loose or corroded battery terminals, poor ground connection).
2. Test battery (or use other battery if in doubt).
3. Starter motor itself.
Also, don't forget to measure the charging voltage of the alternator once you have found the problem. It should be between about 13.8 and 14.4 volts.
The relay may pull, but it could also be due to the carbon brushes that are out of contact (or worn or stuck).
Measure starter motor:
Connect a voltmeter to B + of the starter motor and check that it indicates approx. 12 Volts (12.4 V no-load is 100% charged). Now start the engine and read the voltage. If it has hardly changed, the supply voltage is good. Now connect the meter to the wire of the relay and start again. About 12 volts should be added to this. If the starter does not work, disassemble it and check it by dismantling and measuring.
I hope the description is a little clear and that the person using it can successfully get the job done with this guide.