This page has been translated with google translate, there may be errors in the stories.
What is understood by valve sets.
Valve adjustment means the adjustment of the clearance between the valves and the operating mechanism (i.e. the camshaft / rocker arms).
Why should you adjust the valve clearance.
The valves and all parts of the operating mechanism will shut off when the engine warms up to operating temperature. Different types of materials and material compositions are used for the valves and mechanism. It is therefore impossible to determine how and where the deportation will take place.
The valves must function under all conditions, so a certain valve clearance is set to ensure this operation.
Another reason for valve clearance is wear. Due to the forceful closing of the valve by the valve spring, the valve will impact on its seat over time. This will reduce the valve clearance. It is a good idea to regularly check the valve clearance and adjust it if necessary.
What happens if the valve clearance is too small.
If the valve clearance is too small, the valve can remain open causing loss of compression. This results in poor engine running, higher fuel consumption and the excessive load can adversely affect the life of the engine. This happens when you adjust your play too tight when adjusting.
What happens if the valve clearance is too great.
If the valve clearance is too great, the valve will not open long enough and not far enough to achieve proper cylinder filling. As a result, lower compression, incomplete combustion, high peak temperatures and little engine power. The excessive load can adversely affect the life of the motor. In addition, the flaps will also make significantly more noise: flapping flaps.
What is a burnt valve.
An (exhaust) valve is a very small part, along which very hot gases flow. The only cooling it has is via the thin valve stem and when it is closed via the seat (this is therefore in the cylinder and not visible from the outside). If the valve clearance is now too small, the valve is closed for a shorter time and can therefore give off less heat and therefore cool less. At best, this leads to faster wear of your valves. With a bit of bad luck, your valve will burn. This causes leakage along the valve (and thus loss of power) and must therefore be replaced. So that is an overhaul where the engine has to be taken apart.
Diesel engines & Gasoline engines.
The valves on a diesel engine must continue to be checked and adjusted more often than valves on a gasoline engine.
When should the valves be adjusted?
It is best to check the valve clearance on a diesel engine at least once a year and to adjust it if necessary. This guarantees a long trouble-free engine life and economical fuel consumption. You can also check every 2 years on sailing boats where the engine makes relatively few hours of operation. Also look for the setting interval in the manual of your motorcycle.
What do you need and what will it cost me.
Ratchet with extension (a good socket set is basic equipment!), Screwdriver and a set of feeler gauges (for sale at Dieseldokter.nl, among others).
How do you know whether the valves are properly adjusted.
The real connoisseur will be able to hear it, but you can only know if they are correct by checking the valve clearance.
Tools.
To adjust the valves you have a well-fitting spanner, screwdriver and a feeler gauge with various blades of different thicknesses to measure the valve clearance. You can buy a set of feeler gauges in the web store of this site.
Sizing.
The valve clearance must be adjusted with a cold or warm engine by means of a feeler gauge. On average, the size for inlet is 0.15 mm, exhaust 0.25 mm for a diesel engine.
Look for the correct valve clearance of your engine in the manual of your engine, it also states whether the valves should be set hot or cold.
What is the in and what is the outlet valve?
In the manual of the engine there is usually a diagram from which you can read which valve is the inlet valve which is the exhaust valve, if you do not have one, you can remove the air filter and look into the air supply duct, then you can usually see where the first inlet valve is is located in the head of the engine.
To clean.
If the engine (valve cover, injectors, etc.) is seriously contaminated, it is advisable to thoroughly clean the matter with a brush with kerosene or diesel before dismantling.
Of course you do not have to clean completely, but you prefer not to have dirt fall into the block when disassembling the valve cover.
Disassembly.
The valve cover must be removed and perhaps also the air filter, make sure you put everything away neatly and tighten it again with the same bolts and nuts. The valve cover gasket can be made of rubber and can then be reused if it has not been sanded.
Adjust valves.
To get the camshaft turning so you can measure valve clearance at all intake valves and exhaust valves, you now need to get the engine moving.
On a motorcycle there is usually a large nut on the crankshaft where you can put a cap to turn the crankshaft / camshaft. Older engines often have the flywheel at the front of the engine, so you can turn the flywheel by hand to move the valve rockers.
If you don't have a visible flywheel on the engine, you can put a ratchet with a cap on the nut of the pulley of the alternator to crank the engine, causing the valve rockers to go up and down.
Is it slipping on the V-strings? By pressing lightly on the V strings, you put a little more pressure and things go around easily.
NOTE: Make sure you go in the correct direction of rotation (start the engine and you know which way is the right one), otherwise you will break the matter. Place an arrow on the flywheel or pulley with a black marker. Then you will know for next time!
Set by the rules.
With a single-cylinder engine, one cylinder can be adjusted with one valve when the other is fully depressed, this method can also be applied with more cylinders, but takes more time.
It is also easy with a 2 cylinder.
Turn the crankshaft in the direction of engine rotation until both valves of 1 cylinder tumble slightly.
(that is when the exhaust valve is closing at the end of the exhaust stroke)
To check whether the cranks are 180 degrees to each other, the valves of the other cylinder must do the same after exactly 1 revolution.
If that is correct, you can measure the valve clearance of the cylinder whose valves are not tumbling (the other ones are!) And adjust it if necessary.
You repeat this after 1 revolution to measure / adjust the other cylinder.
With 4 or more you can keep the inflammation sequence. (1-3-4-2 for a 4 cylinder and 1-5-3-6-4-2 for a 6 cylinder)
Set cylinder 1 (the cylinder furthest from the reversing head) "to tumble", so with both cams of the camshaft down (for engines with 1 camshaft).
The outlet valve is then almost closed and the inlet valve is almost opening. Measure the clearance between the camshaft and the rocker arm.
With the 4-cylinder engine you can now also adjust the valves of the 4th cylinder and with a 6-cylinder engine the 6th cylinder. So you can measure 2 plays at the same time. With 12 inlet and outlet valves, that means turning 6 times. You work through the entire ignition sequence.
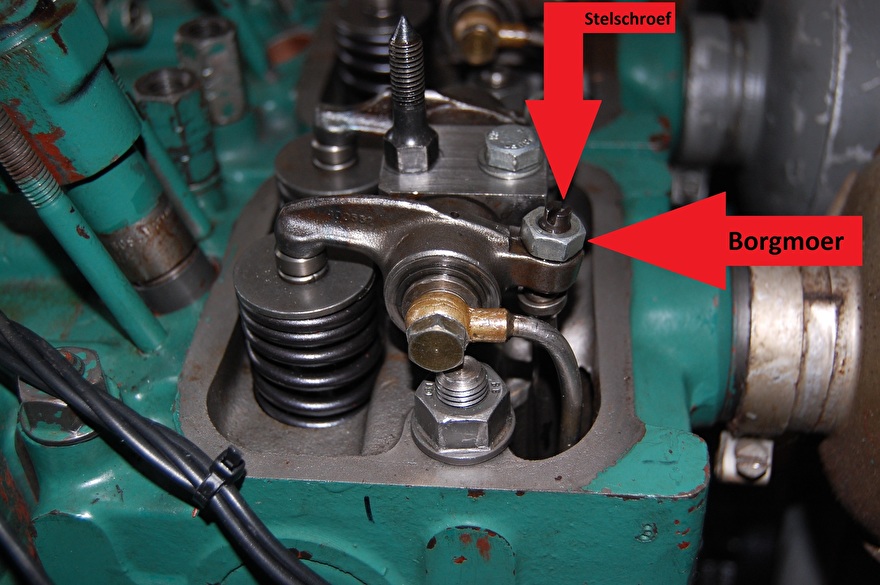
The valve adjustment itself is done by turning the adjusting bolt on top of the valve / under the rocker arm using the valve adjusting wrench and a ratchet or screwdriver and spanner
Counterclockwise is more play and clockwise is less play.
Do not set by the rules.
All books say: Follow firing order to set the valves (1-3-4-2 for a 4-cylinder and 1-5-3-6-4-2 for a 6-cylinder). In all fairness, it works fine to finish everything in the order it presents itself to you. As long as you make sure that all valves are addressed. So write down what you did.
Valve sets: Practice.
Step 1.
Adjust / check first cylinder
Turn the crankshaft, possibly with the help of a wrench on the large nut of the crankshaft. In the meantime, pay attention to the movement of the tumblers. When one of the valves is fully depressed you can adjust the other.
Step 2.
Loosen the locknut on the rocker arm whose clearance is to be checked and turn the adjusting bolt one or two turns high.
Step 3.
Select the feeler gauge with the clearance value specified in the engine manual and insert it between the valve stem and rocker arm. Gently move the feeler gauge while tightening the adjusting bolt until you feel the feeler gauge squeeze in between the valve stem and the rocker arm.
Step 4.
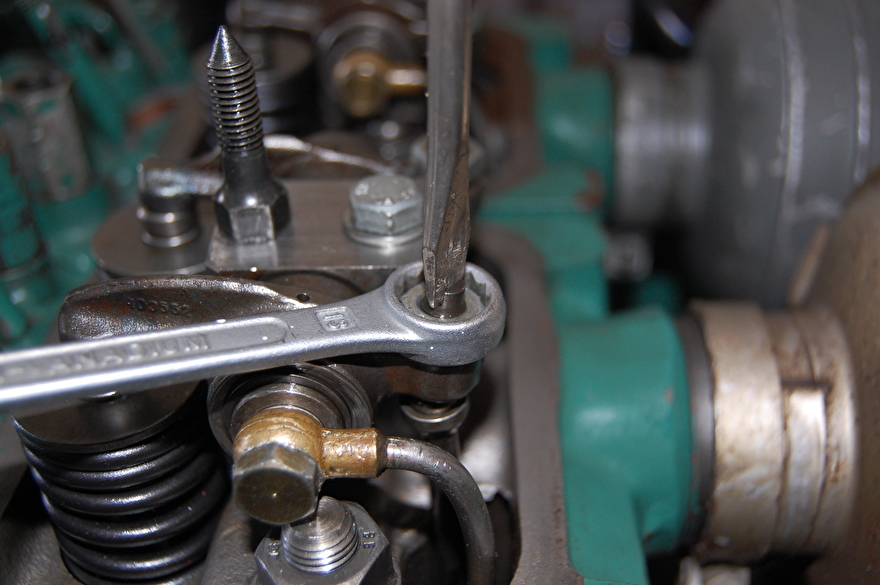
Now hold the set screw with a screwdriver while retightening the locknut. When it is properly tightened, move the feeler gauge. It must be able to be moved back and forth with some friction without actually being pinched.
Step 5.
Repeat this for each valve and check the clearance of the valves with a feeler gauge after adjusting to make sure you did it right.
Assemble.
Clean the edge on which the valve cover rests grease and dirt with a clean cloth and fit the valve cover, checking that the rubber gasket is properly seated and seated. Do not overtighten the bolts of the lid, because then you run the risk of the lid bending / bulging (a fairly common ailment).
Test run the engine and check that the valve cover gasket is tight and that no oil is leaking past the block. So get ready to turn the engine off.
Possible Problems and Solutions.
1. The valve cover gasket is no longer good: Buy a new gasket. Do not use liquid gasket, bits can come loose and clog the coarse oil filter in the engine.
2. Oil is leaking from the packing: check that the packing is seated properly and that it is not damaged
3. Gasket is good, but oil is still leaking: Is the valve cover over tightened? This causes deformation of the lid.
4. I have very stubborn set screws: If the set screw is very tight, the wrench slips on the bolts. Solution is: disassemble the rocker arm, remove the spring and push the valve down slightly. Then with a ring spanner (which fits over it because the tumbler is out of the way) make everything normal again by turning back and forth a few times. Then put everything back together and adjust the valve with a spanner.
5. The valve adjusting screw cannot be adjusted further: There is now too much wear on the valve concerned. Consult an expert for an overhaul or learn to live with higher consumption and flapping valves.
6. My engine used to run fine, but now suddenly very irregular / bad: You accidentally swapped or broke 2 spark plug cables (petrol engine), pulled out a vacuum hose, pulled out a wire or did something else wrong, put it back or loosened it, etc. etc.
Correctly adjusted valves do not result in a bad running engine. Check everything again.